Structural Design Pattern
These design patterns concern class and object composition. Concept of inheritance is used to compose interfaces and define ways to compose objects to obtain new functionalities
Patterns Covered –
- Adaptor Design Pattern
- Bridge Design Pattern
- Composite Design Pattern
- Decorator
- Facade
- Flyweigh
- Proxy
Abbrev (structure is made of ABCD i.e basics)- A.B.C.D. Fac.Fly. proxy i,e A.B.C.D. does Fake Fly using Proxy
Adaptor design pattern
- Definition
- Advatages
- Usage / Use cases
- Example – Elements of Adaptor DP
- Implementation
Definition-
An Adapter Pattern says that just “converts the interface of a class into another interface that a client wants”.
Explanation Detail of definition-
- In other words, to provide the interface according to client requirement while using the services of a class with a different interface.
- Adapters are used when we have a class (Client) expecting some type of object and we have an object (Adaptee) offering the same features but exposing a different interface.
The Adapter Pattern is also known as Wrapper.
Advantage of Adapter Pattern
- It allows two or more previously incompatible objects to interact.
- It allows reusability of existing functionality.
Usage of Adapter pattern:
It is used:
- When an object needs to utilize an existing class with an incompatible interface.
- When you want to create a reusable class that cooperates with classes which don’t have compatible interfaces.
- When you want to create a reusable class that cooperates with classes which don’t have compatible interfaces.
Example of Adaptor Pattern
Let’s understand the example of adapter design pattern by the above UML diagram.
UML for Adapter Pattern:
There are the following specifications for the adapter pattern:
- Target Interface: This is the desired interface class which will be used by the clients.
- Adaptor class: (middleman / mediator class) This class is a wrapper class which implements the desired target interface and modifies the specific request available from the Adaptee class.
- Adaptee class: (existing business logic class) This is the class which is used by the Adapter class to reuse the existing functionality and modify them for desired use.
- Client: This class will interact with the Adapter class.
Flow of call
To use an adapter:
- The client makes a request to the adaptor by calling a method on it using the target interface.
- The adaptor translates that request on the adaptee using the adaptee interface.
- Client receive the results of the call and is unaware of adapter’s presence.
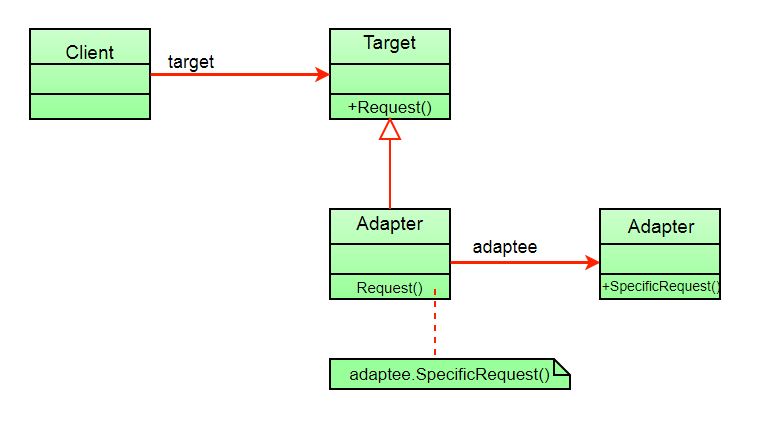
The client sees only the target interface and not the adaptor. The adaptor implements the target interface. Adaptor delegates all requests to Adaptee.
Implementation
Suppose you have a Bird class with fly() , and makeSound()methods. And also a ToyDuck class with squeak() method. Let’s assume that you are short on ToyDuck objects and you would like to use Bird objects in their place. Birds have some similar functionality but implement a different interface, so we can’t use them directly. So we will use adapter pattern. Here our client would be ToyDuck and adaptee would be Bird.
Below is Java implementation of it.
interface Bird
{
    // birds implement Bird interface that allows
    // them to fly and make sounds adaptee interface
    public void fly();
    public void makeSound();
}
class Sparrow implements Bird
{
    // a concrete implementation of bird
    public void fly()
    {
        System.out.println("Flying");
    }
    public void makeSound()
    {
        System.out.println("Chirp Chirp");
    }
}
interface ToyDuck
{
    // target interface
    // toyducks dont fly they just make
    // squeaking sound
    public void squeak();
}
class PlasticToyDuck implements ToyDuck
{
    public void squeak()
    {
        System.out.println("Squeak");
    }
}
class BirdAdapter implements ToyDuck // implemented so it to be subtype of ToyDuck i.e convertible/ usable
{
    // You need to implement the interface your
    // client expects to use.
    Bird bird;
    public BirdAdapter(Bird bird)
    {
        // we need reference to the object we
        // are adapting
        this.bird = bird;
    }

    public void squeak()
    {
        // translate the methods appropriately
        bird.makeSound();
    }
}
class Main
{
    public static void main(String args[])
    {
        Sparrow sparrow = new Sparrow();
        ToyDuck toyDuck = new PlasticToyDuck();

        // Wrap a bird in a birdAdapter so that it
        // behaves like toy duck
        ToyDuck birdAdapter = new BirdAdapter(sparrow);

        System.out.println("Sparrow...");
        sparrow.fly();
        sparrow.makeSound();

        System.out.println("ToyDuck...");
        toyDuck.squeak();

        // toy duck behaving like a bird
        System.out.println("BirdAdapter...");
        birdAdapter.squeak();
    }
}
Output:
Sparrow...
Flying
Chirp Chirp
ToyDuck...
Squeak
BirdAdapter...
Chirp Chirp
Explanation :
Suppose we have a bird that can makeSound(), and we have a plastic toy duck that can squeak(). Now suppose our client changes the requirement and he wants the toyDuck to makeSound than ?
Simple solution is that we will just change the implementation class to the new adapter class and tell the client to pass the instance of the bird(which wants to squeak()) to that class.
Before : ToyDuck toyDuck = new PlasticToyDuck();
After : ToyDuck toyDuck = new BirdAdapter(sparrow);
You can see that by changing just one line the toyDuck can now do Chirp Chirp !!
Object Adapter Vs Class Adapter
The adapter pattern we have implemented above is called Object Adapter Pattern because the adapter holds an instance of adaptee. There is also another type called Class Adapter Pattern which use inheritance instead of composition but you require multiple inheritance to implement it.
Class diagram of Class Adapter Pattern:
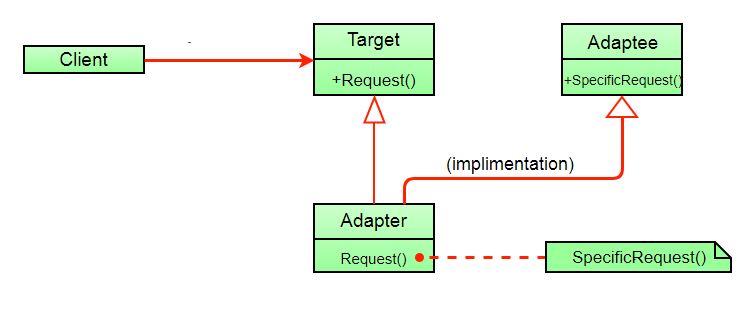
Here instead of having an adaptee object inside adapter (composition) to make use of its functionality adapter inherits the adaptee.
Since multiple inheritance is not supported by many languages including java and is associated with many problems we have not shown implementation using class adapter pattern.
Technical Question
- For what reason are the class not compatible to client side
References
- gfg –>head first dp
- JavaTPoint
Bridge Design Pattern
- Introduction
- Defination
- Explanation
- Implementation
- Similarity with other Design pattern
- The Bridge design pattern allows you to separate the abstraction from the implementation.
- The implementation of bridge design pattern follows the notion to prefer Composition over inheritance.
There are 2 parts in Bridge design pattern :
- Abstraction
- Implementation
Points on Pattern-
- The bridge pattern allows the Abstraction and the Implementation to be developed independently and the client code can access only the Abstraction part without being concerned about the Implementation part.
- The abstraction is an interface or abstract class and the implementer is also an interface or abstract class.
- The abstraction contains a reference to the implementer. Children of the abstraction are referred to as refined abstractions, and children of the implementer are concrete implementers. Since we can change the reference to the implementer in the abstraction, we are able to change the abstraction’s implementer at run-time. Changes to the implementer do not affect client code.
- It increases the loose coupling between class abstraction and it’s implementation
UML Diagram of Bridge Design Pattern

Elements of Bridge Design Pattern
- Abstraction – core of the bridge design pattern and defines the crux. Contains a reference to the implementer.
- Refined Abstraction – Extends the abstraction takes the finer detail one level below. Hides the finer elements from implemetors.
- Implementer – It defines the interface for implementation classes. This interface does not need to correspond directly to the abstraction interface and can be very different. Abstraction imp provides an implementation in terms of operations provided by the Implementer interface.
- Concrete Implementation – Implements the above implementer by providing the concrete implementation.
// Java code to demonstrate
// bridge design pattern

// abstraction in bridge pattern
abstract class Vehicle {
    protected Workshop workShop1;
    protected Workshop workShop2;

    protected Vehicle(Workshop workShop1, Workshop workShop2)
    {
        this.workShop1 = workShop1;
        this.workShop2 = workShop2;
    }

    abstract public void manufacture();
}
/ Refine abstraction 1 in bridge pattern
class Car extends Vehicle {
//to be used for setting context (of implementer class) during calling
    public Car(Workshop workShop1, Workshop workShop2)
    {
        super(workShop1, workShop2);
    }

    @Override
    public void manufacture()
    {
        System.out.print("Car ");
        workShop1.work();
        workShop2.work();
    }
}
// Refine abstraction 2 in bridge pattern
class Bike extends Vehicle {
//to be used for setting context during calling
    public Bike(Workshop workShop1, Workshop workShop2)
    {
        super(workShop1, workShop2);
    }

    @Override
    public void manufacture()
    {
        System.out.print("Bike ");
        workShop1.work();
        workShop2.work();
    }
}
// Implementor for bridge pattern
interface Workshop
{
    abstract public void work();
}
// Concrete implementation 1 for bridge pattern
class Produce implements Workshop {
    @Override
    public void work()
    {
        System.out.print("Produced");
    }
}
// Concrete implementation 2 for bridge pattern
class Assemble implements Workshop {
    @Override
    public void work()
    {
        System.out.print(" And");
        System.out.println(" Assembled.");
    }
}
// Demonstration of bridge design pattern
class BridgePattern {
    public static void main(String[] args)
    {
        Vehicle vehicle1 = new Car(new Produce(), new Assemble());
        vehicle1.manufacture();
        Vehicle vehicle2 = new Bike(new Produce(), new Assemble());
        vehicle2.manufacture();
    }
}
Output :
Car Produced And Assembled.
Bike Produced And Assembled.
Here we’re producing and assembling the two different vehicles using Bridge design pattern.
Without Bridge Design Pattern

But the above solution has a problem. If you want to change the Bus class, then you may end up changing Produce Bus and Assemble Bus as well and if the change is workshop specific then you may need to change the Bike class as well.
With Bridge Design Pattern
You can solve the above problem by decoupling the Vehicle and Workshop interfaces in the below manner.

Does it sound similar to Adaptor pattern ?
- Bridge pattern decouples an abstraction and implementation elements of a class by creating two separate class hierarchies to change independently, whereas an Adapter pattern helps two incompatible classes to work together.
- Also, as stated by GOF “Adapter makes things work after they’re designed; on the other hand Bridge makes them work before they are.” . It means Adapter pattern is commonly used with already developed application for two incompatible classes to work together . whereas Bridge pattern is usually designed up-front to allow a developer to develop a part of an application and letting other part to be written independently by someone.
Relations with other Design patterns :
- Bridge, State, Strategy(and to some extent Adapter) have very similar structures(based out of “Composition”) which delegates job to other objects . However, they all are meant to solve different set of problems.
Reference-
- gfg
- medium – https://medium.com/@amritlalsahu5/bridge-design-pattern-9afad7138777
- journalev – https://www.journaldev.com/1491/bridge-design-pattern-java
Composite Design Pattern
- Definition
- FOr more daeatils check PDF
Compose objects into tree structure to represent part-whole hierarchies. Composite lets client treat individual objects and compositions of objects uniformly
Explanations
- When dealing with Tree-structured data, programmers often have to discriminate between a leaf-node and a branch. This makes code more complex, and therefore, error prone. The solution is an interface that allows treating complex and primitive objects uniform
The key concept is that you can manipulate a single instance of the object just as you would manipulate a group of them. The operations you can perform on all the composite objects often have a least common denominator relationship.
The Composite Pattern has four participants:
- Component – (or root[my understanding] )Component declares the interface for objects in the composition and for accessing and managing its child components. It also implements default behaviour for the interface common to all classes as appropriate.
- Leaf – (or leaf[my understanding] ) Leaf defines behaviour for primitive objects in the composition. It represents leaf objects in the composition.
- Composite – (or child/intermediate[my understanding] ) Composite stores child components and implements child related operations in the component interface.
- Client – Client manipulates the objects in the composition through the component interface.
Client use the component class interface to interact with objects in the composition structure. If recipient is a leaf then request is handled directly. If recipient is a composite, then it usually forwards request to its child components, possibly performing additional operations before and after forwarding.
Composite design pattern treats each node in two ways:
1) Composite – Composite means it can have other objects below it.
2) leaf – leaf means it has no objects below it.

Interface Component.java
public interface Employee
{
	public void showEmployeeDetails();
}
Leaf.java
public class Developer implements Employee
{
	private String name;
	private long empId;
	private String position;

	public Developer(long empId, String name, String position)
	{
		this.empId = empId;
		this.name = name;
				this.position = position;
	}

	@Override
	public void showEmployeeDetails()
	{
		System.out.println(empId+" " +name+);
	}
}
Leaf.java
public class Manager implements Employee
{
	private String name;
	private long empId;
		private String position;

	public Manager(long empId, String name, String position)
	{
		this.empId = empId;
		this.name = name;
				this.position = position;
	}

	@Override
	public void showEmployeeDetails()
	{
		System.out.println(empId+" " +name);
	}
}
Composite.java
import java.util.ArrayList;
import java.util.List;

public class CompanyDirectory implements Employee
{
	private List<Employee> employeeList = new ArrayList<Employee>();

	@Override
	public void showEmployeeDetails()
	{
		for(Employee emp:employeeList)
		{
			emp.showEmployeeDetails();
		}
	}

	public void addEmployee(Employee emp)
	{
		employeeList.add(emp);
	}

	public void removeEmployee(Employee emp)
	{
		employeeList.remove(emp);
	}
}
Client.java
public class Company
{
	public static void main (String[] args)
	{
		Developer dev1 = new Developer(100, "Lokesh Sharma", "Pro Developer");
		Developer dev2 = new Developer(101, "Vinay Sharma", "Developer");
		CompanyDirectory engDirectory = new CompanyDirectory();
		engDirectory.addEmployee(dev1);
		engDirectory.addEmployee(dev2);

		Manager man1 = new Manager(200, "Kushagra Garg", "SEO Manager");
		Manager man2 = new Manager(201, "Vikram Sharma ", "Kushagra's Manager");

		CompanyDirectory accDirectory = new CompanyDirectory();
		accDirectory.addEmployee(man1);
		accDirectory.addEmployee(man2);

		CompanyDirectory directory = new CompanyDirectory();
		directory.addEmployee(engDirectory);
		directory.addEmployee(accDirectory);
		directory.showEmployeeDetails();
	}
}
When to use Composite Design Pattern?
Composite Pattern should be used when clients need to ignore the difference between compositions of objects and individual objects. If programmers find that they are using multiple objects in the same way, and often have nearly identical code to handle each of them, then composite is a good choice, it is less complex in this situation to treat primitives and composites as homogeneous.
- Less number of objects reduces the memory usage, and it manages to keep us away from errors related to memory like java.lang.OutOfMemoryError.
- Although creating an object in Java is really fast, we can still reduce the execution time of our program by sharing objects.
When not to use Composite Design Pattern?
- Composite Design Pattern makes it harder to restrict the type of components of a composite. So it should not be used when you don’t want to represent a full or partial hierarchy of objects.
- Composite Design Pattern can make the design overly general. It makes harder to restrict the components of a composite. Sometimes you want a composite to have only certain components. With Composite, you can’t rely on the type system to enforce those constraints for you. Instead you’ll have to use run-time checks.
Decorator Design pattern
A Decorator Pattern says that just “attach a flexible additional responsibilities to an object dynamically”.
In other words, The Decorator Pattern uses composition instead of inheritance to extend the functionality of an object at runtime.
The Decorator Pattern is also known as Wrapper.
Usualally We use inheritance to extend the behavior of the class. This takes place at compile-time, and all the instances of that class get the extended behavior.
- Decorator patterns allow a user to add new functionality to an existing object without altering its structure. So, there is no change to the original class.
- The decorator design pattern is a structural pattern, which provides a wrapper to the existing class.
- Decorator design pattern uses abstract classes or interfaces with the composition to implement the wrapper.
- Decorator design patterns create decorator classes, which wrap the original class and supply additional functionality by keeping the class methods’ signature unchanged.
- Decorator design patterns are most frequently used for applying single responsibility principles since we divide the functionality into classes with unique areas of concern.
- The decorator design pattern is structurally almost like the chain of responsibility pattern.
Advantage of Decorator Pattern
- It provides greater flexibility than static inheritance.
- It enhances the extensibility of the object, because changes are made by coding new classes.
- It simplifies the coding by allowing you to develop a series of functionality from targeted classes instead of coding all of the behavior into the object.
- It is used when-
- you want to transparently and dynamically add responsibilities to objects without affecting other objects.
- Extending functionality by sub-classing is no longer practical.
Procedure:
- Create an interface.
- Create concrete classes implementing the same interface.
- Create an abstract decorator class implementing the above same interface.
- Create a concrete decorator class extending the above abstract decorator class.
- Now use the concrete decorator class created above to decorate interface objects.
- Lastly, verify the output
Step 1: Creating an interface named ‘Shape’
Example
// Interface named Shape
// Shape.java
public interface Shape {
	void draw();
}
Step 2: Create concrete classes implementing the same interface. Rectangle.java and Circle.java are as follows
Example
// Circle.java
public class Circle implements Shape {

	@Override
	public void draw()
	{
		System.out.println("Shape: Circle");
	}
}
Circle.java
public class Circle implements Shape {

   @Override
   public void draw() {
      System.out.println("Shape: Circle");
   }
}
Step 3
Create abstract decorator class implementing the Shape interface.
ShapeDecorator.java
public abstract class ShapeDecorator implements Shape {
   protected Shape decoratedShape;

   public ShapeDecorator(Shape decoratedShape){
      this.decoratedShape = decoratedShape;
   }

   public void draw(){
      decoratedShape.draw();
   }
}
Step 4
Create concrete decorator class extending the ShapeDecorator class.
RedShapeDecorator.java
public class RedShapeDecorator extends ShapeDecorator {

   public RedShapeDecorator(Shape decoratedShape) {
      super(decoratedShape);
   }

   @Override
   public void draw() {
      decoratedShape.draw();	       //from super class
      setRedBorder(decoratedShape);
   }

   private void setRedBorder(Shape decoratedShape){
      System.out.println("Border Color: Red");
   }
}
Step 5
Use the RedShapeDecorator to decorate Shape objects.
DecoratorPatternDemo.java
public class DecoratorPatternDemo {
   public static void main(String[] args) {

      Shape circle = new Circle();

      Shape redCircle = new RedShapeDecorator(new Circle());

      Shape redRectangle = new RedShapeDecorator(new Rectangle());
      System.out.println("Circle with normal border");
      circle.draw();

      System.out.println("\nCircle of red border");
      redCircle.draw();

      System.out.println("\nRectangle of red border");
      redRectangle.draw();
   }
}
Step 6
Verify the output.
Circle with normal border
Shape: Circle

Circle of red border
Shape: Circle
Border Color: Red

Rectangle of red border
Shape: Rectangle
Border Color: Red
Facade Design pattern
A Facade Pattern says that just “just provide a unified and simplified interface(in terms of coding it’s a class) to a set of interfaces in a subsystem, therefore it hides the complexities of the subsystem from the client”.
In other words, Facade Pattern describes a higher-level interface that makes the sub-system easier to use.
Advantage of Facade Pattern
- It shields the clients from the complexities of the sub-system components.
- It promotes loose coupling between subsystems and its clients.
Steps-
Step 1
Create an interface.
Shape.java
public interface Shape {
   void draw();
}
Step 2
Create concrete classes implementing the same interface.
Rectangle.java
public class Rectangle implements Shape {

   @Override
   public void draw() {
      System.out.println("Rectangle::draw()");
   }
}
Square.java
public class Square implements Shape {

   @Override
   public void draw() {
      System.out.println("Square::draw()");
   }
}
Circle.java
public class Circle implements Shape {

   @Override
   public void draw() {
      System.out.println("Circle::draw()");
   }
}
Step 3
Create a facade class.
ShapeMaker.java – Moderator It is used to either return the object or process (see exmaple at end for return example)
public class ShapeMaker {
   private Shape circle;
   private Shape rectangle;
   private Shape square;

   public ShapeMaker() {
      circle = new Circle();
      rectangle = new Rectangle();
      square = new Square();
   }

   public void drawCircle(){
      circle.draw();
   }
   public void drawRectangle(){
      rectangle.draw();
   }
   public void drawSquare(){
      square.draw();
   }
}
Step 4
Use the facade to draw various types of shapes.
FacadePatternDemo.java
public class FacadePatternDemo {
   public static void main(String[] args) {
      ShapeMaker shapeMaker = new ShapeMaker();

      shapeMaker.drawCircle();
      shapeMaker.drawRectangle();
      shapeMaker.drawSquare();
   }
}
Additional example – to show the return object example from facade
package structural.facade;
public interface Hotel
{
	public Menus getMenus();
}
//step2
package structural.facade;

public class NonVegRestaurant implements Hotel
{
	public Menus getMenus()
	{
		NonVegMenu nv = new NonVegMenu();
		return nv;
	}
}

//sanother impl
package structural.facade;

public class VegRestaurant implements Hotel
{
	public Menus getMenus()
	{
		VegMenu v = new VegMenu();
		return v;
	}
}
//amnother impl
package structural.facade;

public class VegNonBothRestaurant implements Hotel
{
	public Menus getMenus()
	{
		Both b = new Both();
		return b;
	}
}

//step 3 facade
package structural.facade;

public class HotelKeeper
{
	public VegMenu getVegMenu()
	{
		VegRestaurant v = new VegRestaurant();
		VegMenu vegMenu = (VegMenu)v.getMenus();
		return vegMenu;
	}

	public NonVegMenu getNonVegMenu()
	{
		NonVegRestaurant v = new NonVegRestaurant();
		NonVegMenu NonvegMenu = (NonVegMenu)v.getMenus();
		return NonvegMenu;
	}

	public Both getVegNonMenu()
	{
		VegNonBothRestaurant v = new VegNonBothRestaurant();
		Both bothMenu = (Both)v.getMenus();
		return bothMenu;
	}
}

//Client Code
package structural.facade;

public class Client
{
	public static void main (String[] args)
	{
		HotelKeeper keeper = new HotelKeeper();

		VegMenu v = keeper.getVegMenu();
		NonVegMenu nv = keeper.getNonVegMenu();
		Both = keeper.getVegNonMenu();

	}
}
